Documentation > WordPress
Installing and Using WordPress Theme Created with Artisteer
Installing WordPress Themes
- Access your Web server using an FTP client or Web server administration tools.
- Create a folder for your specific theme under "wp-content/themes" folder within WordPress installation.
For example: <WordPressFolder>\wp-content\themes\<YourThemeName>
- Copy or upload theme files exported from Artisteer into the newly created <YourThemeName> folder.
- Log in to your WordPress administration panel and select Appearance -> Themes.
- In the 'Available Themes' section find your theme title and screenshot, then click the 'Activate' link to activate it.
For more information please refer to the official WordPress documentation:
http://codex.wordpress.org/Using_Themes#Adding_New_Themes
If you use latter versions of WordPress (2.8-3.x),there is an alternative way for installing new themes. In the versions 2.8 and 2.9 you can install a theme by taking the path
Appearance -> Add New Themes from your administration panel, and if you have WordPress 3.x - by selecting the new tab "Install Themes" at
Appearance -> Themes -> Install Themes.
To install a WordPress theme, please follow the steps below:
- Export your WordPress theme from Artisteer as a zip file;
- Log in to your WordPress administration panel and select Appearance -> Themes;
- Switch to the "Install Themes" tab (in WP 3.x) or select "Add New Themes" (in WP 2.8, 2.9);
- Use the Upload link in the top menu to upload and install a zipped copy of a theme exported from Artisteer.

After the activation you will see the following message:

- Click the "Add Content" button if you import content for the first time.
- Click the "Replace Imported Content" button if you have re-exported the theme from Artisteer (e.g., with the edited articles).
Note: If you want to import content, enable please
"Include Content" in Artisteer before exporting the theme.
WordPress Widget Areas
Starting with Artisteer 4.1 creation of Footer Widget Areas is supported. For more information please refer to
this section.
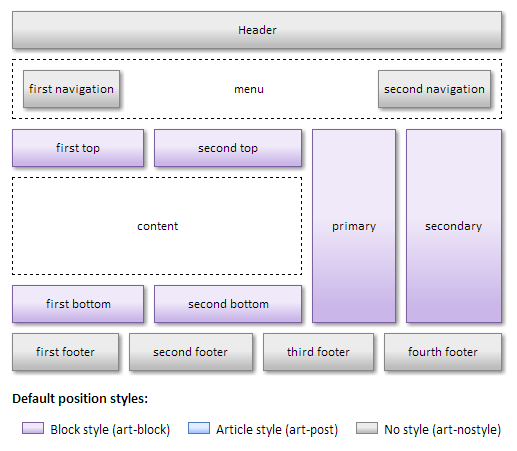
The position style, shown before, is the default one. You can change it by yourself as well. For this please do the following:
- Go to Appearance -> Widgets and choose the widget you'd like to edit.
- Click "Edit".
- Under the Theme Options -> Appearance select the appropriate widget appearance: as the rest of sidebar, as a block, as a post or as simple text.

Adding Widgets to Header
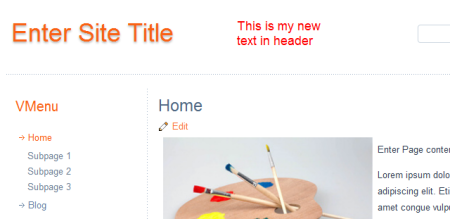
In Artisteer 4.0 you can add widgets to Header and position them with CSS code. Please follow the steps below:
- Go to Appearance -> Widgets and add a widget to the Header Widget Area. Your widget will appear in the top left corner of the Header.
- Use a debug tool like Mozilla Firebug to define and copy the widget id.
- Open Appearance -> Editor and scroll to the bottom of the file. Paste the widget id preceded by # (number sign) and type the appropriate CSS positioning, e.g:
#search-1
{
top: 20px;
left: 50%;
}
"Position" Control
Starting with version 4 Artisteer supports Custom Position control in Header. This new control is used for creating multiple additional widget areas in Header after template export.
Please follow the instruction below to use the new header control:
- Navigate Header tab -> Insert -> Controls -> Position.
- Right-click on the control-ID -> select Options, and put the custom ID in the Name field (e.g. MyControl).
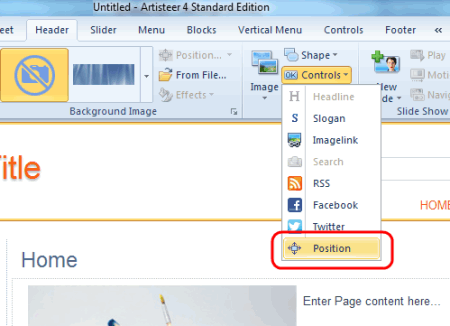
- After exporting and installing the template go to Wordpress Dashboard -> Appearance -> Widgets, create a widget and assign it to the widget area created by this control in Artisteer.
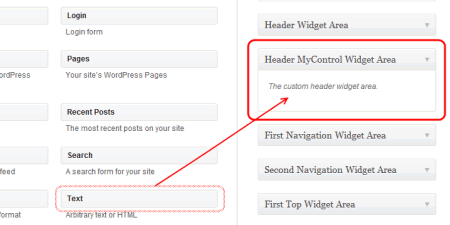
The "Name" option in Position control's Options in Artisteer at the same time defines the name of a new widget area and the ID of the container, which can be used later for adding extra styles for this widget area in the style.css file.
For example:
#MyControl
{
 font-size: 18px;
 color: red;
}
The code can be added to the end of the style.css file in Wordpress Dashboard -> Appearance -> Editor or in Artisteer Export Options (File -> Export -> CSS Options) before export.
The text in our sample widget has become red and larger now:
Creating Vertical Menu
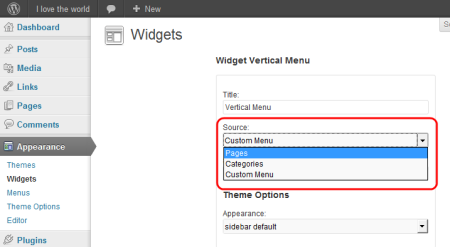
You can add a vertical menu from WordPress Administration (for dynamic sidebars) by going to
Appearance -> Widgets -> Vertical menu.
After adding the menu you can select its source by pressing
"Edit" and specifying the source as "Pages", or "Categories", or "Custom Menu".
Grouping of Vertical Menu Items
Items in Vertical Menus can be grouped by a special menu item type called
separator. For such menu items the URL is not assigned, which means they do not link to a particular web page, but serve as list items that name certain groups of links.
Starting from version 3.0 Beta 2, Artisteer templates for WordPress support Vertical Menus with separators. To enable menu separators, please update Artisteer, open your .artx project, re-export the template and apply it to WordPress.
To create a custom Vertical Menu with separators:
- Create/Open your custom Vertical Menu in Dashboard -> Appearance -> Menus -> [custom menu name].
- Go to the "Custom Links" block, enter # symbol in the URL field and name the separator (e.g. my separator 1). Press "Add to Menu" and see the newly created separator in the list with other Vertical Menu items. Continue the procedure to add more separator menu items.
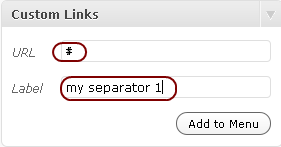
- Create new menu items or drag and drop the existing items to place them inside the separator menu item. Press "Save Menu" and go to your website to check the Vertical Menu.

Customizing Particular Pages
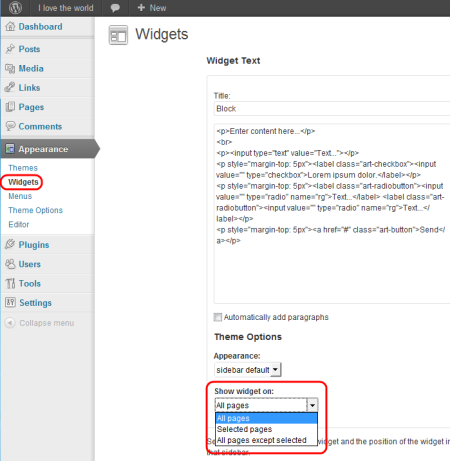
"Show widget on..."
You can choose to display widgets on particular pages with the new option
"Show widgets on...". To do this, follow the steps below:
- Go to Appearance -> Widgets and choose the widget you'd like to show on particular pages.
- Click "Edit" and under the "Theme Options" choose to display the widget on all pages except the selected page or specify the pages where the widget is displayed.
 Creating Different Pages Layout
In Artisteer 4 you can customize particular page layout options such as whether to show it in menu, or to show header on this page etc.
To customize a particular page:
- Go to Wordpress Administration -> Pages.
- Choose the particular page out of the list and click "Edit".
- Customize the page features under the "Theme Options".
 Setting Different Header Images
Starting from Artisteer 4 you can set different header images on different pages. To do this, please follow the steps below:
- Go to Wordpress Administration -> Pages.
- Choose the page you want to set the particular header image on, and click "Edit".
- Click "Set header image" under the "Page Header Image".
- Choose and upload the image.
- Customize the alignment, size and other image options; edit the image, if necessary.
- Click the "Save all changes" button.

Creating localized WordPress Themes with Artisteer
When exporting themes Artisteer automatically includes several language files obtained from Wordpress Website at
http://codex.wordpress.org/WordPress_Localization
Specifically French, German, Italian and Spanish translations are exported by Artisteer in the Wordpress compliant file naming format:
<country>_<lang>.mo
For example German language file is:
de_DE.mo
Installing additional language support
To include a different or additional language support in your Worpdress theme
please find and copy the desired language files into your specific Wordpress theme folder.
You can find the additional language files in your default theme folder
"
<WordPressFolder>\wp-content\themes\default",
or on the Wordpress Website at
http://codex.wordpress.org/WordPress_Localization.
To select a different language than your current Wordpress language, change the "define" function in the wp-config.php file, for example:
define('WPLANG', 'de_DE').
Editing translations
To edit translations for your language please download and install Codestyling Localization plug-in from
http://wordpress.org/extend/plugins/codestyling-localization/.
Then in WordPress administration select
Manage -> Localization.
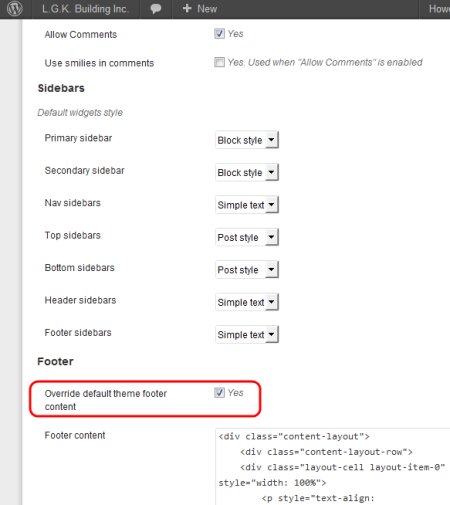
Customizing the Footer
Starting from Artisteer 3.0 the footer dummy text can be customized directly in Artisteer (Footer > Text... dialog). This text will not appear on your website. To change the content of your Footer go to
WP Administration -> Appearance-> Theme Options -> Footer content.
Starting with version 4.1 Artisteer generates footer widget areas by Content Layout cells in Footer.
For the compatibility with the themes created with previous Artisteer versions, the "old" footer widget areas layout is also kept in the WP themes exported from Artisteer. To switch to the "old" footer layout:
- Please navigate WP Dashboard -> Appearance -> Theme Options -> Footer.
- Check the "Override default theme footer content" option: